
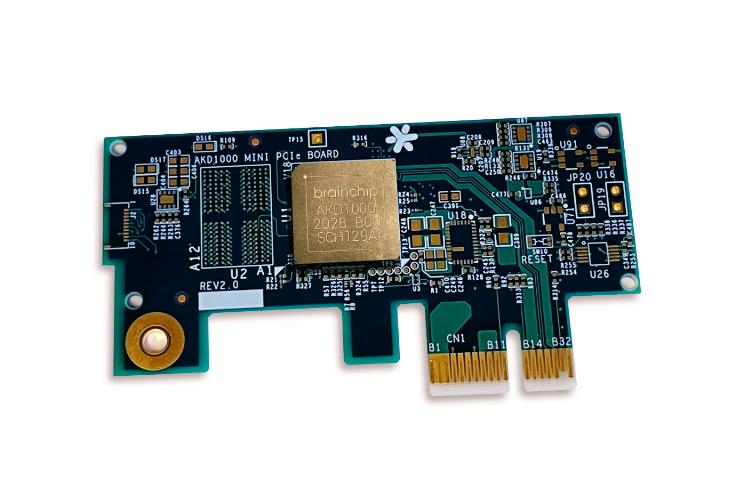

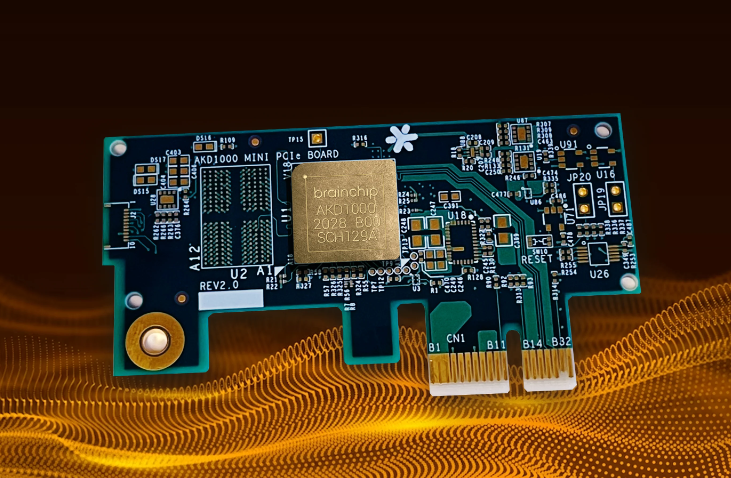


Technische Spezifikationen
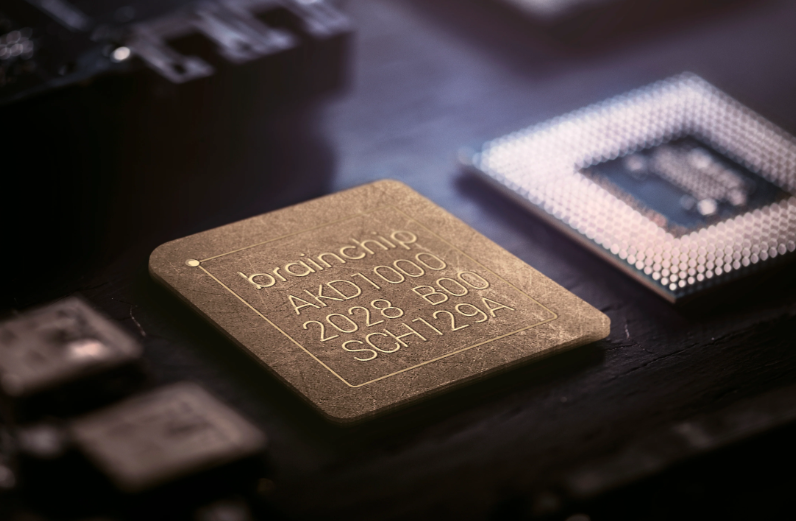
- Prozessor: ARM Cortex-M4 32-Bit @ 300MHz (Teilblock von Akida)
- RAM: 256M x 16 Bytes LPDDR4 SDRAM @ 2400MT/s
- FLASH: Quad SPI 128Mb NOR @ 12,5MHz
- Überwachung: Onboard Akida-Core-Strommonitor
- Kompatibilität: Eine x86-64 PC-Architektur, wie sie in jedem Intel-basierten Computer, etwa mit i5-, i7- oder i9-Prozessor, zu finden ist. Oder eine aarch64 Maschinenarchitektur, wie sie beispielsweise im Raspberry Pi 4 (IO-Motherboard + CS-Daughterboard) verwendet wird.
-
OS: Linux Ubuntu 16.04, 18.04 and 20.04
- GPIO: 2 LEDs
- Schnittstellen: 5GT/s PCI Express 2.0 x 1-Lane
- Abmessungen: 40mm x 76mm x 5,3mm (ohne PCIe-Rückwandhalterung)
- Gewicht: 15g (ohne PCIe-Rückwandhalterung)
- Befestigung: Kleiner Formfaktor PCIe-Rückwandhalterung im Lieferumfang enthalten (1,6" x 3")
Installation und Einrichtung
-
Akida PCIe-Karte einbauen:
- Stecken Sie Ihre Akida PCIe-Karte in Ihr System ein.
-
Installation überprüfen:
- Öffnen Sie das Terminal und überprüfen Sie, ob die PCIe-Karte erkannt wird, indem Sie den Befehl
lspci | grep Co-processorausführen. -
Erwartete Ausgabe:
Co-processor: Device 1e7c:bca1 (rev 01)
- Öffnen Sie das Terminal und überprüfen Sie, ob die PCIe-Karte erkannt wird, indem Sie den Befehl
-
Akida-Treiber herunterladen:
- Klonen Sie das Akida-Treiber-Repository von GitHub mit:
git clone https://github.com/Brainchip-Inc/akida_dw_edma
- Klonen Sie das Akida-Treiber-Repository von GitHub mit:
-
Treiber installieren:
- Befolgen Sie die Anweisungen in der README.md-Datei oder verwenden Sie die folgenden Befehle:
- Notwendige Pakete installieren:
sudo apt install build-essential linux-headers-$(uname -r) - Wechseln Sie in das Verzeichnis des geklonten Repositories:
cd akida_dw_edma - Führen Sie das Installationsskript aus:
sudo ./install.sh
- Notwendige Pakete installieren:
- Hinweis: Diese Schritte entfernen alle alten Treiberversionen, installieren die neue, konfigurieren die Module zum Laden beim Booten und gewähren allen Benutzern Lese-/Schreibzugriff auf /dev/akida*.
- Befolgen Sie die Anweisungen in der README.md-Datei oder verwenden Sie die folgenden Befehle:
-
Akida-Paket herunterladen:
- Installieren Sie das Akida-Paket in Ihrer Python-Umgebung mit:
pip install akida
- Installieren Sie das Akida-Paket in Ihrer Python-Umgebung mit:
-
Akida-Gerät überprüfen:
- Überprüfen Sie, ob das Akida-Gerät erkannt wird, indem Sie den Befehl
akida devicesausführen. -
Erwartete Ausgabe:
Available devices PCIe/NSoC_v2
- Überprüfen Sie, ob das Akida-Gerät erkannt wird, indem Sie den Befehl
Hinweis: Sollten Sie auf Probleme stoßen, beachten Sie bitte die Troubleshooting-Richtlinien im Benutzerhandbuch.
Dokumente:
English Description
Technical Specifications
- Processor: ARM Cortex-M4 32-bit @ 300MHz (Subblock of Akida)
- RAM: 256M x 16 bytes LPDDR4 SDRAM @ 2400MT/s
- FLASH: Quad SPI 128Mb NOR @ 12.5MHz
- Monitoring: Onboard Akida core current monitor
- Compatibility: An x86-64 PC architecture, such as any intel, i5, i7, i9 based computer. Or an aarch64 machine architecture such as a Raspberry Pi 4 (IO mother board + CS daughter board).
- OS: Linux Ubuntu 16.04, 18.04 and 20.04
- GPIO: 2 LED's
- Interfaces: 5GT/s PCI Express 2.0 x 1-lane
- Dimensions: 40mm x 76mm x 5.3mm (excluding PCIe rear panel bracket)
- Weight: 15g (excluding PCIe rear panel bracket)
- Bracket: Small form factor PCIe rear panel bracket included (1.6" x 3")
Installation and Setup
-
Insert the Akida PCIe Card:
- Plug in your Akida PCIe card into your system.
-
Verify Installation:
- Open Terminal and check if the PCIe card is recognized by running the command:
lspci | grep Co-processor. -
Expected Output:
Co-processor: Device 1e7c:bca1 (rev 01)
- Open Terminal and check if the PCIe card is recognized by running the command:
-
Get the Akida Driver:
- Clone the Akida driver repository from GitHub using:
git clone https://github.com/Brainchip-Inc/akida_dw_edma
- Clone the Akida driver repository from GitHub using:
-
Install the Driver:
- Follow the instructions in the README.md file or use the following commands:
- Install necessary packages:
sudo apt install build-essential linux-headers-$(uname -r) - Change directory to the cloned repository:
cd akida_dw_edma - Run the installation script:
sudo ./install.sh
- Install necessary packages:
- Note: These steps will remove any old driver versions, install the new one, configure the modules to load at boot, and provide read/write access to /dev/akida* for all users.
- Follow the instructions in the README.md file or use the following commands:
-
Download Akida Package:
- Install the Akida package in your Python environment using:
pip install akida
- Install the Akida package in your Python environment using:
-
Verify Akida Device:
- Check if the Akida device is recognized by running:
akida devices -
Expected Output:
Available devices PCIe/NSoC_v2
- Check if the Akida device is recognized by running:
Note: If you encounter any issues, refer to the Troubleshooting guidelines in the user guide.
Documents:
GPSR - EU Verantwortliche Person: Maximilian Batz, PI3G GmbH & Co. KG, Zschochersche Allee 1, 04207 Leipzig, Deutschland, support [@] pi3g.com
GPSR - Produkthersteller (Kontaktdaten für GPSR): BrainChip Inc., 23041 Avenida De La Carlota, Suite 250, Laguna Hills CA 92653, Vereinigte Staaten von Amerika, +1 949 784 0040, sales [@] brainchip.com
GPSR - Wirtschaftsakteur: Maximilian Batz, PI3G GmbH & Co. KG, Zschochersche Allee 1, 04207 Leipzig, Deutschland, support [@] pi3g.com
Sicherheitsangaben
- Lesen Sie die Bedienungsanleitung sorgfältig durch, bevor Sie das Produkt verwenden.
- Stellen Sie sicher, dass alle Montage- und Installationsanweisungen des Herstellers sorgfältig befolgt werden.
- Verwenden Sie das Produkt nur für den vorgesehenen Zweck.
- Die unsachgemäße Nutzung dieses Produkts kann zu schweren Verletzungen oder Sachschäden führen.
- Nicht für Kinder unter 10 Jahren geeignet.
- Bei unsachgemäßer Verwendung besteht eine Verletzungsgefahr.
- Dieses Produkt entspricht den geltenden Sicherheitsanforderungen der Europäischen Union.
- Dieses Produkt wurde gemäß der GPSR geprüft, die sicherstellt, dass alle relevanten Sicherheitsanforderungen für Konsumgüter eingehalten werden.
Nachverfolgbarkeitsinformationen
Jedes Produkt verfügt über eines oder mehrere der folgenden Merkmale:
- Ein CE-Kennzeichen, das die Einhaltung der Sicherheits-, Gesundheits- und Umweltschutzanforderungen der Europäischen Union anzeigt.
- Eine eindeutige Serien- oder Chargennummer, um die Nachverfolgbarkeit zu gewährleisten und bei Bedarf Rückrufaktionen zu unterstützen.
- Hersteller- und Importeurangaben für den Kundensupport und Sicherheitsanfragen.
Überwachung und Berichterstattung von Vorfällen
Für den unwahrscheinlichen Fall eines Produktproblems haben wir Verfahren implementiert, um:
- Kundenbeschwerden zeitnah bearbeiten.
- Schwerwiegende Vorfälle über das EU Safety Gate/RAPEX-System melden.
- Mit den Marktüberwachungsbehörden zusammenarbeiten, um die öffentliche Sicherheit zu gewährleisten.
Kontakt:
- Email: support [@] pi3g.com
- Telefon: 0341 / 392 858 40
Dieses Produkt ist vollständig mit allen geltenden EU-Vorschriften konform, um die Sicherheit unserer geschätzten Kunden zu gewährleisten.