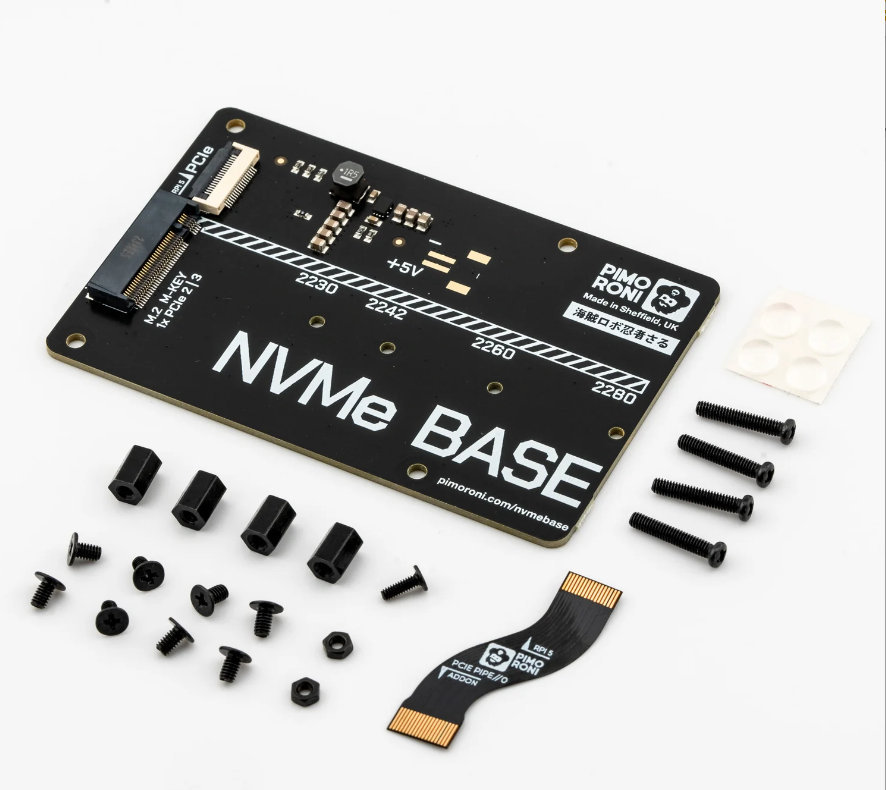
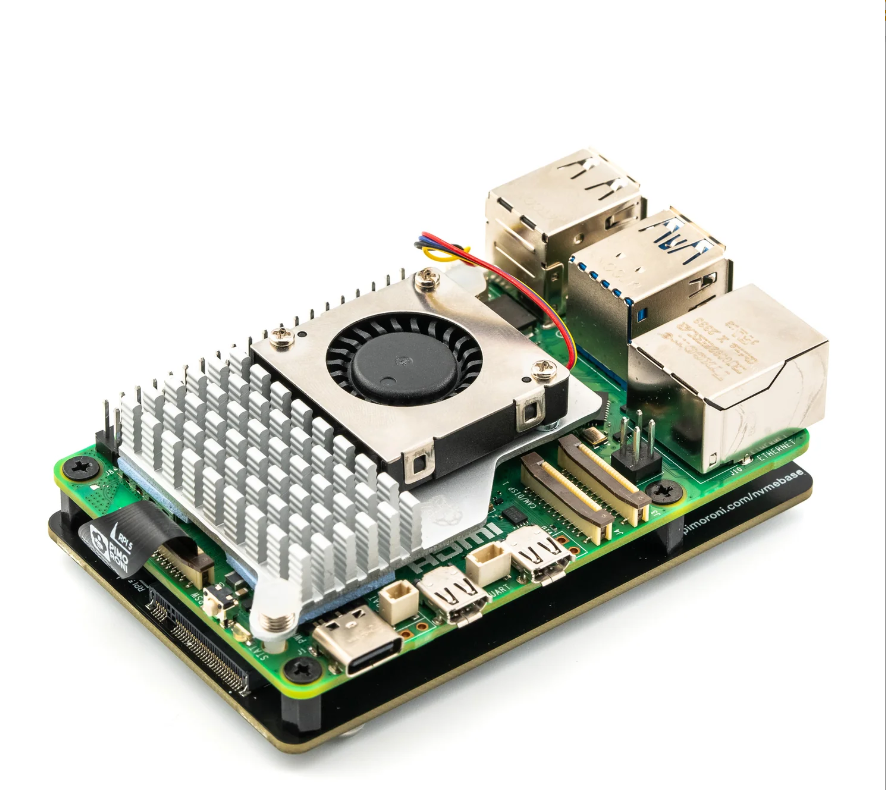
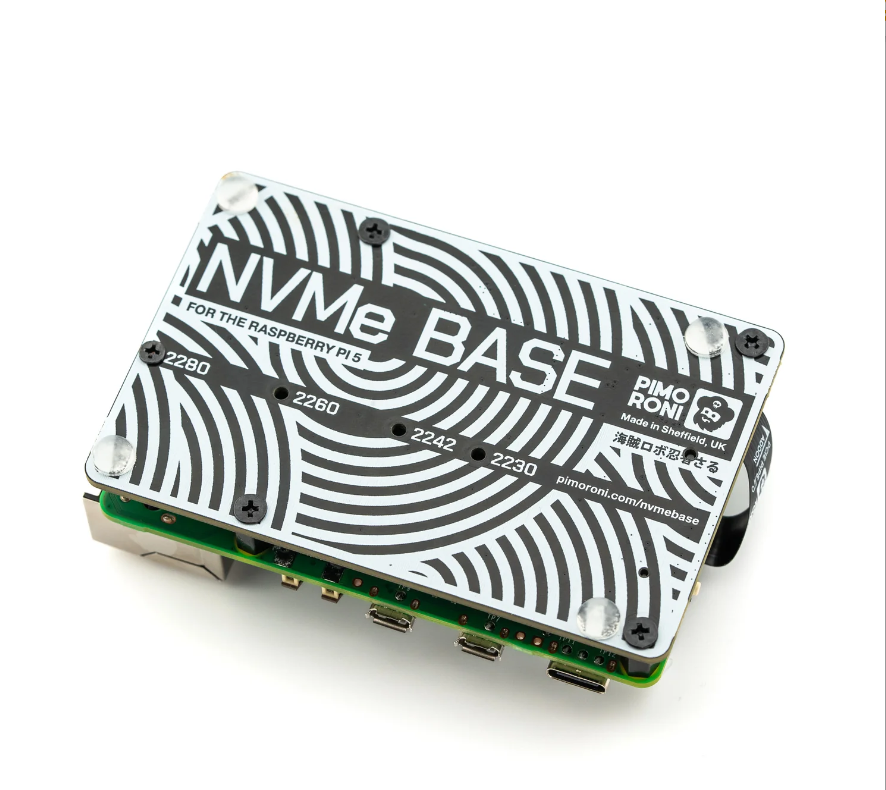
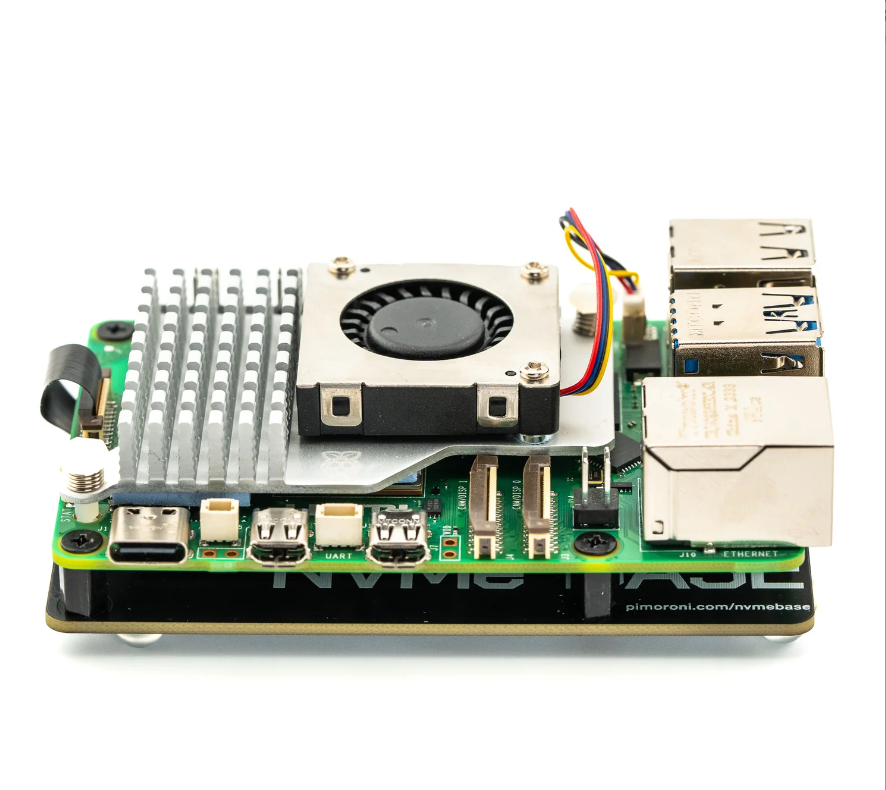
NVMe Base ist eine PCIe-Erweiterungsplatine für den Raspberry Pi 5. Bestücken Sie sie einfach mit einer M-Key-NVMe-SSD (unterstützte Größen: 2230 bis 2280) und montieren Sie sie unter Ihrem Pi für eine kompakte und schnelle Speicherlösung – Gummifüße sind sogar enthalten!
Es ist die perfekte Lösung, um Ihren Raspberry Pi 5 in einen Dateiserver, ein Medienzentrum, einen Reverse-Proxy usw. zu verwandeln – wirklich für jede Aufgabe, die von großen Mengen an schnellem Speicher profitiert, insbesondere bei zufälligen, hochfrequenten Operationen pro Sekunde (IOPS). Kurz gesagt, es ist ein echter Game Changer!
NVMe Base folgt den neuen „PIP“-Designrichtlinien von Raspberry Pi, die sicherstellen, dass es einfach zu bedienen ist und langfristig durch Updates des Raspberry Pi OS unterstützt wird – obwohl es noch früh ist und sich die Dinge schnell verbessern!
Basis-Kit
- NVMe Base PCB mit M.2-Steckplatz (M-Key)
- „PCIe Pipe“ Flachbandkabel
- 4x Gummifüße
- M2-Schraube und 2x Muttern zur SSD-Befestigung
- 4x 7mm M2.5-Abstandshalter zur Basisbefestigung
- 8x kurze M2.5-Schrauben zur Basisbefestigung
- 4x lange M2.5-Schrauben zur „Pass-Thru“-Befestigung mit einem HAT
NVMe Base + SSD Bundle
Wir bieten das Kit im Bundle mit einer 250GB+ oder 500GB+ NVMe-SSD (PCIe Gen 3 oder besser) an.
Der Raspberry Pi 5 wird bestenfalls mit PCIe 3.0 x 1-Geschwindigkeiten laufen, auch wenn dieser Modus offiziell nicht unterstützt wird. Die meisten Laufwerke sind daher auf etwa 700-800MB/s Lese- und 350-450MB/s Schreibgeschwindigkeit begrenzt.
Aufgrund der Schwankungen des SSD-Marktes liefern wir das Laufwerk, das das beste Preis-Leistungs-Verhältnis für anständige Spezifikationen bietet. Wir können sagen, dass:
- Es eine Kapazität von 250GB / 500GB (oder mehr) haben wird.
- Es vom Hersteller mit PCIe Gen 3 oder besserer Geschwindigkeit bewertet wird.
- Pimoroni das Laufwerk persönlich mit der NVMe Base getestet hat und es in der untenstehenden Liste aufgeführt ist.
- Es durch die üblichen Garantien und den Kundendienst von Pimoroni abgesichert ist.
Laufwerkskompatibilität
Pimoroni hat die NVMe Base erfolgreich mit den folgenden M.2 NVMe-Laufwerken getestet. Pimoroni hat in der Regel ein Laufwerk aus einer Charge getestet, daher ist dies keine umfassende oder „zugelassene“ Liste, sondern eine gute Orientierungshilfe für zu suchende Laufwerke:
- AData Legend 700
- AData Legend 800
- AData XPG SX8200 Pro
- Axe Memory Generic Drive
- Crucial P2 M.2
- Crucial P3 M.2
- Crucial P3 Plus M.2
- Inland PCIe NVMe SSD
- Kingston KC3000
- Kioxia Exceria NVMe SSD
- Kioxia Exceria G2 NVMe SSD
- Lexar NM620
- Lexar NM710
- Netac NV2000 NVMe SSD
- Netac NV3000 NVMe SSD
- Origin Inception TLC830 Pro NVMe
- Sabrent Rocket 4.0
- Sabrent Rocket Nano
- Samsung 980
- Samsung 980 Pro (500GB/1TB)
- Team MP33
- Western Digital Black SN750 SE (Phison-Controller)
„Vielleicht“-Liste. Funktioniert mit Eigenheiten/nicht ideal.
Diese Laufwerke benötigten entweder zusätzliche Stromversorgung, waren bei Tests etwas eigenwillig oder es gab Berichte über Probleme. Es könnte nur das Laufwerk sein, das Pimoroni hatte, aber sie sollten wahrscheinlich vermieden werden.
- Kioxia BG4 2230. Sehr ungleichmäßige Leistung. Läuft bei recht hoher Temperatur.
- Patriot P300 – Diese Laufwerke haben verschiedene Controller, von denen einige derzeit nicht kompatibel zu sein scheinen.
- Patriot P310 – Diese Laufwerke haben verschiedene Controller, von denen einige derzeit nicht kompatibel zu sein scheinen.
- PNY CS1030 (250GB). Berichte, dass diese Größe nicht funktioniert.
- Samsung 970 EVO Plus. Läuft bei höherer Temperatur. Einige Nutzerberichte über Probleme bei hoher Last oder nicht erkanntem Laufwerk beim Start.
- Samsung 980 Pro (250GB). Berichte, dass diese Größe nicht funktioniert.
- WD Blue SN550. Unser neues Gerät konnte als Speicher verwendet werden, aber nicht davon gebootet werden.
- WD Red SN700. Zuerst langsam beim Booten, funktionierte dann aber gut.
- WD SN740. Unser neues Gerät funktionierte gut. Ihre Erfahrungen können variieren.
- WD Black SN770. Unser neues Gerät funktionierte einwandfrei. Ihre Erfahrungen können variieren.
„Vermeiden“-Liste. Pimoroni hatte Probleme oder Berichte über Probleme.
- Kingston OM8SEP4256Q-A0
- Transcend 110Q (TS500GMTE110Q)
- WD Green/Blue/Red/Black, nicht in der obigen Liste. Variable Ergebnisse oder nicht funktionierend aufgrund von Eigenheiten eines SanDisk-Controllers/Firmware. Unser SN350 und SN570 verhinderten, dass der RPi 5 überhaupt bootete.
Ansonsten sollte jedes M.2 NVMe-Laufwerk (kein SATA!), das Sie herumliegen haben, einwandfrei funktionieren.
Schauen Sie sich unsere Benchmark-Ergebnisse auf pibenchmarks.net an!
Erste Schritte
- Video: Installation der Pimoroni NVMe Base auf dem Raspberry Pi 5
- Anleitung: Erste Schritte mit NVMe Base für Raspberry Pi 5
Firmware
Für das problemloseste Erlebnis stellen Sie sicher, dass Ihr Raspberry Pi OS auf dem neuesten Stand ist und Ihre RPi 5 Firmware auf dem Stand von 2023-12-06 (6. Dezember) oder neuer ist. Dies unterstützt alle Funktionen der RPi-PCIe-Spezifikation und bedeutet, dass Sie keine Konfigurationsdateien anpassen müssen, um loszulegen.
Ein Software-Update auf dem RPi OS sollte dies für Sie erledigen, aber um es zu erzwingen, können Sie:
- Ein Terminal öffnen (Strg-Alt-T)
-
sudo raspi-configausführen und unterAdvanced Options > Bootloader Version„Latest“ wählen.
Mit sudo rpi-eeprom-update im Terminal können Sie feststellen, welche Firmware-Version läuft.
PCIe 3 Modus
Um den experimentellen und nicht offiziell unterstützten PCIe 3 Modus zu aktivieren, fügen Sie der [all] Sektion am Ende Ihrer Raspberry Pi /boot/firmware/config.txt Datei die folgende Zeile hinzu:
[]
dtparam=pciex1_gen=3
Speichern und neu starten – Ihr Laufwerk ist einsatzbereit!
Formatierung der NVMe und Booten von NVMe
Wenn Sie vom NVMe-Laufwerk booten möchten, folgen Sie diesen zusätzlichen Schritten:
1. Stellen Sie sicher, dass Ihre Firmware wie oben aktualisiert ist!
2. Formatieren Sie das Laufwerk mit dem Raspberry Pi Imager.
3. Sie können dies mit installiertem NVMe Base tun, indem Sie den RPi 5 von einer SD-Karte booten und den Raspberry Pi Imager aus dem Startmenü ausführen.
4. Ein Terminal öffnen (Strg-Alt-T).
5. sudo raspi-config ausführen.
6. Wählen Sie NVMe/USB-Boot unter Advanced Options > Boot Order.
7. Starten Sie Ihren RPi 5 neu.
Hinweise
- Schalten Sie Ihren RPi immer aus und trennen Sie die Stromversorgung, bevor Sie die NVMe Base installieren oder deinstallieren.
- NVMe Base bietet eine allgemeine PCIe x1 Verbindung – während wir wissen, dass die meisten Leute schnellen Speicher hinzufügen möchten, können Sie theoretisch auch andere Geräte verwenden. Wir können Ihnen jedoch nicht helfen, diese zum Laufen zu bringen! :-D
Ressourcen
English Description:
NVMe Base is a PCIe extension board for Raspberry Pi 5. Simply populate it with an M-key NVMe SSD (2230 to 2280 sizes supported) and mount it under your Pi for a compact and fast storage solution - It even comes with rubber feet!
It's the perfect solution for turning your Raspberry Pi 5 into a file server, media centre, reverse proxy, etc. - really any task that benefits from large amounts of fast storage, especially with random high operations per second (IOPS) workloads. In short it's a game changer!
NVMe base follows the new "PIP" design guidelines provided by Raspberry Pi ensuring that it will be easy to use and be supported long term by updates to Raspberry Pi OS - though it is very early days and things are improving rapidly there!
Base Kit
- NVMe Base PCB with M.2 Slot (M-Key)
- 'PCIe Pipe' Flat Flex Cable
- 4x Rubber feet
- M2 bolt and 2x nuts for SSD mounting
- 4x 7mm M2.5 standoffs for base mounting
- 8x short M2.5 bolts for base mounting
- 4x long M2.5 bolts for 'pass-thru' mounting with a HAT
NVMe Base + SSD Bundle
We offer the kit bundled with a 250GB+ or 500GB+ NVMe SSD (PCIe Gen 3 or better).
The Raspberry Pi 5 will run at PCIe 3.0 x 1 speeds at best, even though this mode is unsupported officially, so most drives are limited to around 700-800MB/s read and 350-450MB write at peak.
Due to the tides and vagaries of the SSD market, we will ship whichever drive offers the best value for decent specs. We can say that:
- It will have 250GB / 500GB (or better) capacity
- It will be rated by the manufacturer at PCIe Gen 3 or better speed
- Pimoroni has personally tested the drive with the NVMe Base and it will be in the list below.
- It'll be backed by the usual Pimoroni guarantees and customer service.
Drive compatibility
Pimoroni has tested NVMe Base with the following M.2 NVMe drives successfully. Pimoroni has usually tested one drive from one batch, so this is not comprehensive, or an 'Approved' list, but it's a good guide for drives to seek out:
- AData Legend 700
- AData Legend 800
- AData XPG SX8200 Pro
- Axe Memory Generic Drive
- Crucial P2 M.2
- Crucial P3 M.2
- Crucial P3 Plus M.2
- Inland PCIe NVMe SSD
- Kingston KC3000
- Kioxia Exceria NVMe SSD
- Kioxia Exceria G2 NVMe SSD
- Lexar NM620
- Lexar NM710
- Netac NV2000 NVMe SSD
- Netac NV3000 NVMe SSD
- Origin Inception TLC830 Pro NVMe
- Sabrent Rocket 4.0
- Sabrent Rocket Nano
- Samsung 980
- Samsung 980 Pro (500GB/1TB)
- Team MP33
- Western Digital Black SN750 SE (Phison Controller
' Maybe' List. Works with quirks/not ideal.
These drives either needed extra power, were a bit quirky when Pimoroni tested them or Pimoroni has had reports of them being problematic. It may just be the drive Pimoroni had, but they're probably best avoided.
- Kioxia BG4 2230. Performance very patchy. Runs at quite a high temp.
- Patriot P300 - These drives have various controllers, some of which seem to be incompatible at this time.
- Patriot P310 - These drives have various controllers, some of which seem to be incompatible at this time.
- PNY CS1030 (250GB). Reports of this size not working.
- Samsung 970 EVO Plus. Runs at a higher temp. Some user reports of problems under heavy load or not showing up on boot.
- Samsung 980 Pro (250GB). Reports of this size not working.
- WD Blue SN550. Our fresh unit could be used as storage but could not be booted from.
- WD Red SN700. Slow to boot first time, but worked and booted OK.
- WD SN740. Our fresh unit worked well. YMMV.
- WD Black SN770. Our fresh unit worked fine. YMMV.
'Avoid' List. We've had problems or reports of problems.
- Kingston OM8SEP4256Q-A0
- Transcend 110Q (TS500GMTE110Q)
- WD Green/Blue/Red/Black not in the above list. Variable results or not working because of quirks of a SanDisk controller/firmware. Our SN350 and SN570 prevented the RPi 5 from booting at all especially.
Otherwise most M.2 NVMe drive (Not SATA!) you have lying around should work fine.
Getting Started
- Video: Installing the Pimoroni NVMe Base on Raspberry Pi 5
- Learn: Getting Started with NVMe Base for Raspberry Pi 5
Firmware
For the most hassle-free experience, make sure your Raspberry Pi OS is up to date, and your RPi 5 firmware is updated to 2023-12-06 (Dec 6th) or newer. This supports all the features of the RPi PCIe spec and means you don't have to mess with config files to get started.
Software update on the RPi OS should do this for you, but to force it you can:
- open a Terminal (Ctrl-Alt-T)
- run
sudo raspi-configand choose 'Latest' under Advanced Options > Bootloader Version.
Running sudo rpi-eeprom-update in the Terminal will tell you which version of firmware is running.
PCIe 3 Mode
To enable experimental and not-officially-supported PCIe 3 mode, add the follow line to the [all] section at the end of your Raspberry Pi /boot/firmware/config.txt file like this:
[all]
dtparam=pciex1_gen=3
Save and reboot - your drive is ready to use!
Formatting the NVMe and booting from NVMe
If you want to boot from the NVMe drive, follow these extra steps:
- Make sure your firmware is updated as above!
- Format the drive using Raspberry Pi Imager
- You can do this with your NVMe Base installed by booting the RPi 5 from SD card and running Raspberry Pi Imager from the start menu.
- Open a Terminal (Ctrl-Alt-T).
- Run
sudo raspi-config - Choose NVMe/USB boot under Advanced Options > Boot Order.
- Reboot your RPi 5.
Notes
- Always power off your RPi and disconnect the power supply before installing or uninstalling the NVMe Base.
- NVMe Base offers a general purpose PCIe x1 connection - while we know most people want to add fast storage in theory you can use other devices with it, we just can't help you make them work! :-D What Would Jeff (Geerling) Do?
Resources
Sicherheitsangaben
- Lesen Sie die Bedienungsanleitung sorgfältig durch, bevor Sie das Produkt verwenden.
- Stellen Sie sicher, dass alle Montage- und Installationsanweisungen des Herstellers sorgfältig befolgt werden.
- Verwenden Sie das Produkt nur für den vorgesehenen Zweck.
- Die unsachgemäße Nutzung dieses Produkts kann zu schweren Verletzungen oder Sachschäden führen.
- Nicht für Kinder unter 10 Jahren geeignet.
- Bei unsachgemäßer Verwendung besteht eine Verletzungsgefahr.
- Dieses Produkt entspricht den geltenden Sicherheitsanforderungen der Europäischen Union.
- Dieses Produkt wurde gemäß der GPSR geprüft, die sicherstellt, dass alle relevanten Sicherheitsanforderungen für Konsumgüter eingehalten werden.
Nachverfolgbarkeitsinformationen
Jedes Produkt verfügt über eines oder mehrere der folgenden Merkmale:
- Ein CE-Kennzeichen, das die Einhaltung der Sicherheits-, Gesundheits- und Umweltschutzanforderungen der Europäischen Union anzeigt.
- Eine eindeutige Serien- oder Chargennummer, um die Nachverfolgbarkeit zu gewährleisten und bei Bedarf Rückrufaktionen zu unterstützen.
- Hersteller- und Importeurangaben für den Kundensupport und Sicherheitsanfragen.
Überwachung und Berichterstattung von Vorfällen
Für den unwahrscheinlichen Fall eines Produktproblems haben wir Verfahren implementiert, um:
- Kundenbeschwerden zeitnah bearbeiten.
- Schwerwiegende Vorfälle über das EU Safety Gate/RAPEX-System melden.
- Mit den Marktüberwachungsbehörden zusammenarbeiten, um die öffentliche Sicherheit zu gewährleisten.
Kontakt:
- Email: support [@] pi3g.com
- Telefon: 0341 / 392 858 40
Dieses Produkt ist vollständig mit allen geltenden EU-Vorschriften konform, um die Sicherheit unserer geschätzten Kunden zu gewährleisten.


